<맨 위로>
- Unity chatGPT
- The type or namespace name ‘NUnit’ could not be found
- The type or namespace name ‘FluentAssertions’ could not be found
- 결과 OpenAI_Test는 들여오지 말것
- The type or namespace name ‘Newtonsoft’ could not be found
- The type or namespace name ‘JsonProperty’ could not be found
- The type or namespace name ‘IHttpClientFactory’ could not be found
- Package Cache 삭제
- AuthenticationException: You must provide API authentication. Please refer to https://github.com/OkGoDoIt/OpenAI-API-dotnet#authentication for details.
- 환경변수를 이용한 키설정
- 채팅 읽기, 아바타 입 움직이기
- Avatar comfigure
- Oculus Lipsync Unity
연구내용입니다. 정리된 내용을 별도의 페이지에 기록될 예정입니다.
Unity chatGPT
- 참고 : https://www.youtube.com/watch?v=gI9QSHpiMW0
- https://github.com/OkGoDoIt/OpenAI-API-dotnet
- https://platform.openai.com/docs/quickstart
- SignUp 한다음
- https://platform.openai.com/api-keys
-
Create new secret key 선택하여 새 키를 만듬
- https://github.com/OkGoDoIt/OpenAI-API-dotnet/releases
- https://github.com/OkGoDoIt/OpenAI-API-dotnet/releases/tag/v1.10
- Source code (zip) 다운로드하여 압축 해제후 프로젝트에 넣기
The type or namespace name ‘NUnit’ could not be found
- 업데이트: C:\Users\username\AppData\Local & C:\Users\username\AppData\LocalLow & C:\Users\username\AppData\Roaming에 있는 모든 Unity 폴더를 삭제하고 새 프로젝트를 생성하면 문제가 해결된 것 같습니다. 문제. 해당 폴더를 삭제하면 편집 시 기본 설정도 삭제된다는 점을 명심하세요.
-
위 방법으로 해결되지 않음. 그런데 유용하다고 이야기가 많네
- Unity와 Visual Studio를 다시 시작하는 데 필요한 “문제”를 발견했습니다. 그런데 Api를 .Net 4.x로 변경하는 것을 잊지 마세요(“동적” 유형을 사용하려는 경우).
-
위 방법으로 해결되지 않음.
- https://nunit.org/download/
- https://github.com/nunit/nunit/releases/tag/4.1.0
- NUnit.Framework-4.1.0.zip 다운받아서 dll 추출
- 해결됨
The type or namespace name ‘FluentAssertions’ could not be found
- https://github.com/fluentassertions/fluentassertions
결과 OpenAI_Test는 들여오지 말것
- test와 관련된 패키지가 다량 누락되었다고 에러가 나는것
The type or namespace name ‘Newtonsoft’ could not be found
The type or namespace name ‘JsonProperty’ could not be found
- Package Manager > Add Package from Git URL
- com.unity.nuget.newtonsoft-json
- 해결됨
The type or namespace name ‘IHttpClientFactory’ could not be found
- https://github.com/OkGoDoIt/OpenAI-API-dotnet/issues/176
- Github에서 https://github.com/GlitchEnzo/NuGetForUnity 로 이동하세요.
- 릴리스로 이동하여 Unity 패키지를 다운로드하세요.
- Unity에서 패키지로 설치합니다. 그러면 Unity용 멋진 NuGet 관리자가 추가됩니다!
- 메뉴에서 NuGet-패키지 관리로 이동합니다.
- 검색 상자에 Microsoft.Extensions.DependencyInjection을 입력하고 설치합니다.
- 검색창에 Microsoft.Extensions.Http를 입력하고 설치하세요.
- 검색 상자에 Newtonsoft.Json을 입력하고 설치하세요.
-
이제 OpenAI를 프로젝트에 놓으면 더 이상 오류가 생성되지 않습니다!
- Microsoft.Bcl.AsyncInterface 까지 추가 설치
- 다 완료된 이후에 OpenAI_API를 넣으면 에러가 없습니다.
- 오히려 ‘Microsoft.Bcl.AsyncInterface’에러가 있네
- Library 폴더를 삭제하고 유니티가 재구성 하게 함 (도움 안되네)
- Csharp.dll로드 에러까지 나와서 프로젝트를 새로 만드니까 괜찮아짐
Package Cache 삭제
해결방법 1 (자동)
- 유니티 상단 메뉴 중 [Help] 선택
- 하위 메뉴 중 ‘Reset packages to default’ 선택
해결방법2 (수동)
- 파일탐색기에서 작업중인 유니티 폴더로 이동한다.
- 오류나는 경로를 찾아간다. 즉 Library 폴더로 이동 후, PackageCache 폴더로 이동한다.
- com.unity… 파일들이 있다. 전체 선택 (Ctrl + A) 후 삭제해준다.
AuthenticationException: You must provide API authentication. Please refer to https://github.com/OkGoDoIt/OpenAI-API-dotnet#authentication for details.
- https://github.com/OkGoDoIt/OpenAI-API-dotnet#authentication
- OPENAI_API_KEY=sk-aaaabbbbbccccddddd
// for example
OpenAIAPI api = new OpenAIAPI("YOUR_API_KEY"); // shorthand
// or
OpenAIAPI api = new OpenAIAPI(new APIAuthentication("YOUR_API_KEY")); // create object manually
// or
OpenAIAPI api = new OpenAIAPI(APIAuthentication LoadFromEnv()); // use env vars
// or
OpenAIAPI api = new OpenAIAPI(APIAuthentication LoadFromPath()); // use config file (can optionally specify where to look)
// or
OpenAIAPI api = new OpenAIAPI(); // uses default, env, or config file
환경변수를 이용한 키설정
- https://help.openai.com/en/articles/5112595-best-practices-for-api-key-safety
- cmd
setx OPENAI_API_KEY “<키>”
echo %OPENAI_API_KEY%
HttpRequestException: Error at chat/completions (https://api.openai.com/v1/chat/completions) with HTTP status code: TooManyRequests. Content:
{
    "error": {
        "message": "You exceeded your current quota, please check your plan and billing details. For more information on this error, read the docs: https://platform.openai.com/docs/guides/error-codes/api-errors.",
        "type": "insufficient_quota",
        "param": null,
        "code": "insufficient_quota"
    }
}
- 나는 같은 문제가있었습니다. 그 이유는 OpenAI 계정을 유료 계정으로 전환하기 전에(신용카드 추가) API 키를 생성했기 때문입니다. 업그레이드만 하는 경우에도 문제가 되지 않으며 완전히 새로운 API 키를 생성해야 합니다.
- 신용카드를 추가한 후 다른 API 키를 생성했는데 제대로 작동했습니다!
-
이 오류는 429 Too Many Requests무료 API 크레딧 $18를 초과했음을 의미합니다. 공식 웹사이트 에서 더 많은 비용을 지불할 수 있습니다 .
- https://platform.openai.com/settings/organization/billing/overview
- 크레딧 카드를 등록하고 금액을 충전
- API Key를 다시 만들면 정상적으로 동작
using System;
using System.Collections;
using System.Collections.Generic;
using OpenAI_API;
using OpenAI_API.Chat;
using OpenAI_API.Models;
using TMPro;
using UnityEngine;
using UnityEngine.UI;

public class OpenAIController : MonoBehaviour
{
    public TMP_Text textfield;
    public TMP_InputField inputfield;
    public Button okButton;

    private OpenAIAPI api;
    private List<ChatMessage> messages;

    // Start is called before the first frame update
    void Start()
    {
        api = new OpenAIAPI(Environment.GetEnvironmentVariable("OPENAI_API_KEY", EnvironmentVariableTarget.User));
        StartConversation();
        okButton.onClick.AddListener(() => GetResponse());
    }

    public void StartConversation()
    {
        messages = new List<ChatMessage>{
            new ChatMessage(ChatMessageRole.System, "you are a human, friendly kindness")
        };
        inputfield.text = "";
        string startString = "you are a human, friendly kindness";
        textfield.text = startString;
        Debug.Log(startString);
    }

    private async void GetResponse()
    {
        Debug.Log("GetResponse");
        Debug.Log(inputfield.text);
        if (inputfield.text.Length < 1)
        {
            return;
        }
        // disable the button
        okButton.enabled = false;

        ChatMessage userMessage = new ChatMessage();
        userMessage.Role = ChatMessageRole.User;
        userMessage.Content = inputfield.text;
        if(userMessage.Content.Length > 100){
            // limit message length to 100 characters
            userMessage.Content = userMessage.Content.Substring(0, 100);
        }
        Debug.Log(string.Format("{0}: {1}", userMessage.rawRole, userMessage.Content));
        messages.Add(userMessage);
        textfield.text = string.Format("You: {0}", userMessage.Content);
        inputfield.text = "";

        //Send the message to the API
        var chatResult = await api.Chat.CreateChatCompletionAsync(
            new ChatRequest(){
                Model = Model.ChatGPTTurbo,
                Temperature = 0.1,
                MaxTokens = 50,
                Messages = messages
            }
        );

        //get the response
        ChatMessage responseMessage = new ChatMessage();
        responseMessage.Role = chatResult.Choices[0].Message.Role;
        responseMessage.Content = chatResult.Choices[0].Message.Content;
        Debug.Log(string.Format("{0}: {1}", responseMessage.rawRole, responseMessage.Content));

        //Add the response to the list of messages
        messages.Add(responseMessage);

        //Update the textfield with the response
        textfield.text = string.Format("You: {0}/n/nGuard: {1}", userMessage.Content, responseMessage.Content);

        //enable the button
        okButton.enabled = true;
    }
}
- https://www.youtube.com/watch?v=lYckk570Tqw
-
https://github.com/srcnalt/OpenAI-Unity
- package manager에서 git url로 등록
-
sample에서 chatGPT import
- auth.json을 생성하고 다음을 입력
{
       "api_key" : " ",
       "organization" : " "
}
using System;
using System.Collections;
using System.Collections.Generic;
using UnityEngine;
using OpenAI;
using UnityEngine.Events;

public class ChatGPTManager : MonoBehaviour
{
    public OnResponseEvent onResponse;
    [System.Serializable]
    public class OnResponseEvent : UnityEvent<string> { }
    private OpenAIApi openAIApi = new OpenAIApi(Environment.GetEnvironmentVariable("OPENAI_API_KEY", EnvironmentVariableTarget.User));
    private List<ChatMessage> messages = new List<ChatMessage>();
    public async void AskChatGPT(string newText)
    {
        ChatMessage newMessage = new ChatMessage();
        newMessage.Content = newText;
        newMessage.Role = "user";

        messages.Add(newMessage);
        CreateChatCompletionRequest request = new CreateChatCompletionRequest();
        request.Messages = messages;
        request.Model = "gpt-3.5-turbo";
        //https://platform.openai.com/docs/guides/rate-limits/usage-tiers 티어확인

        var response = await openAIApi.CreateChatCompletion(request);
        if(response.Choices != null && response.Choices.Count > 0)
        {
            var chatResponse = response.Choices[0].Message;
            messages.Add(chatResponse);

            Debug.Log(chatResponse.Content);

            onResponse.Invoke(chatResponse.Content);
        }
    }
}
-
https://www.youtube.com/watch?v=Cg4k-XPBC2Q
-
https://assetstore.unity.com/packages/essentials/starter-assets-thirdperson-updates-in-new-charactercontroller-pa-196526
- https://www.youtube.com/watch?v=TnmbyP5_R90
- https://youtu.be/usrxIUGK9Gc?si=eYqScnkVRCn0qqBY
채팅 읽기, 아바타 입 움직이기
-
https://youtu.be/Q4sPGTVylnY?si=TQI9Jhd3iqh11-cc
- https://readyplayer.me/
- https://assetstore.unity.com/packages/tools/game-toolkits/ready-player-me-avatar-and-character-creator-259814?locale=ko-KR
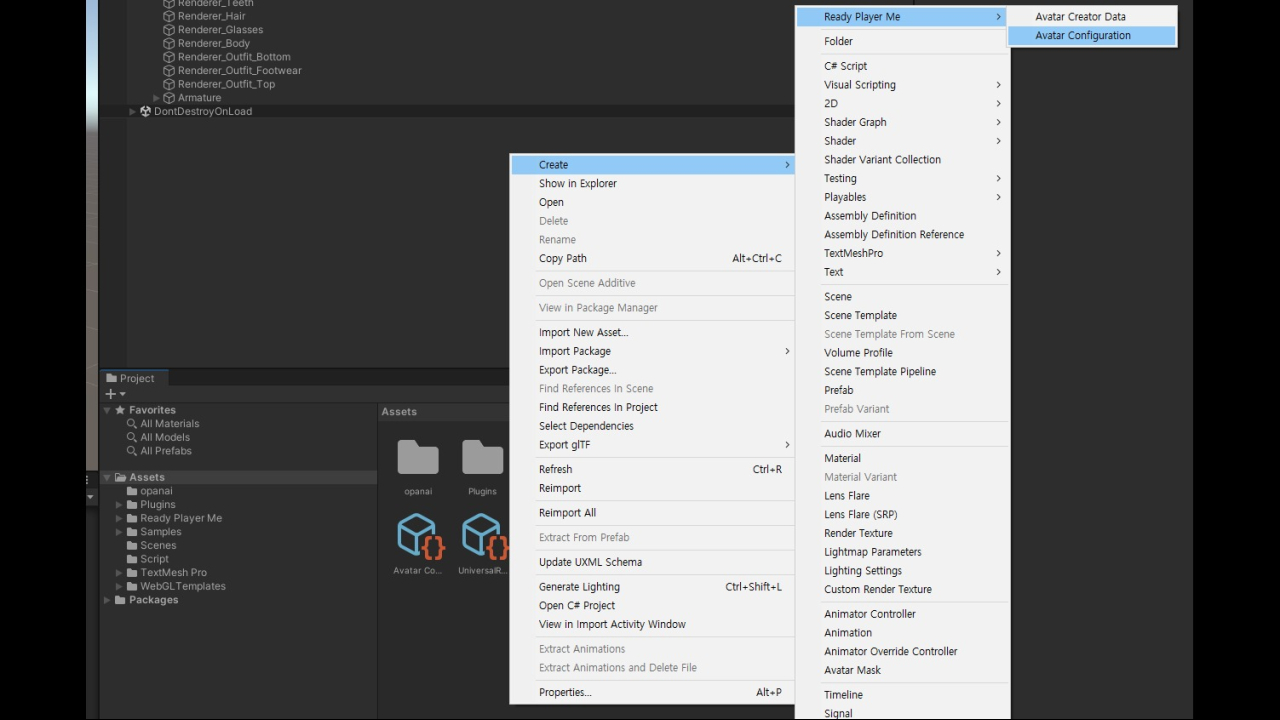
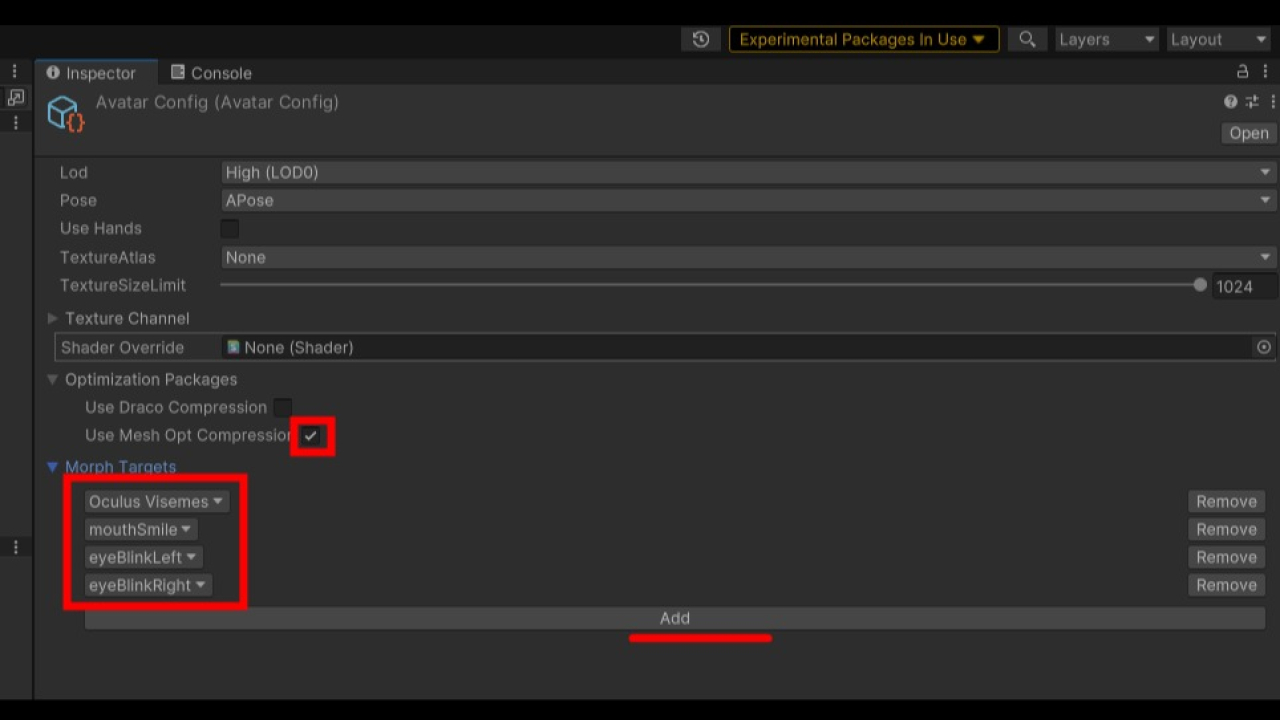
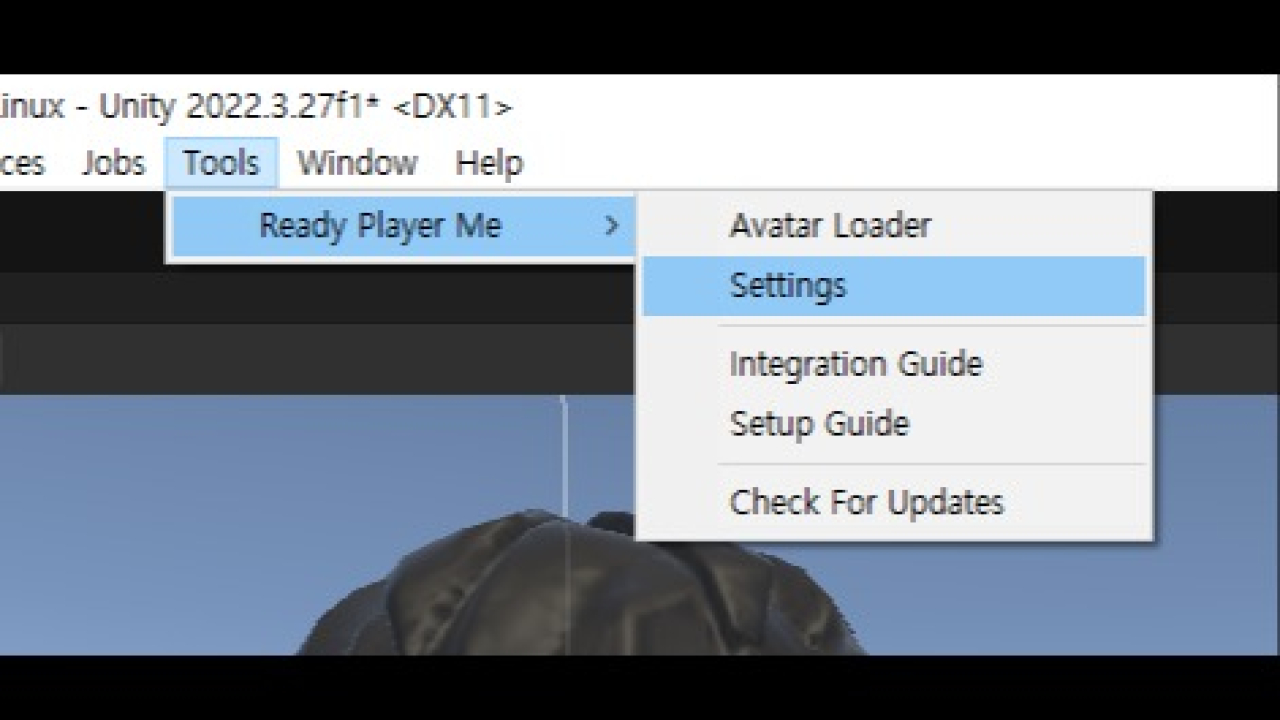
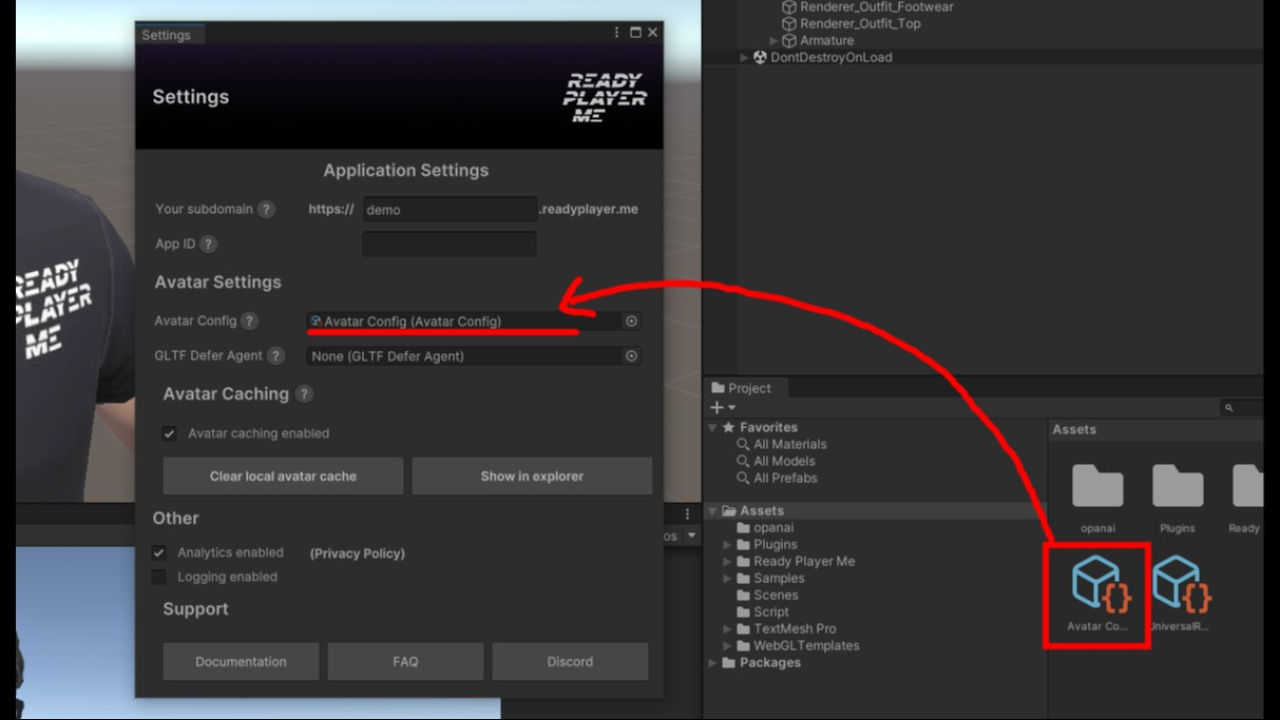
Avatar comfigure
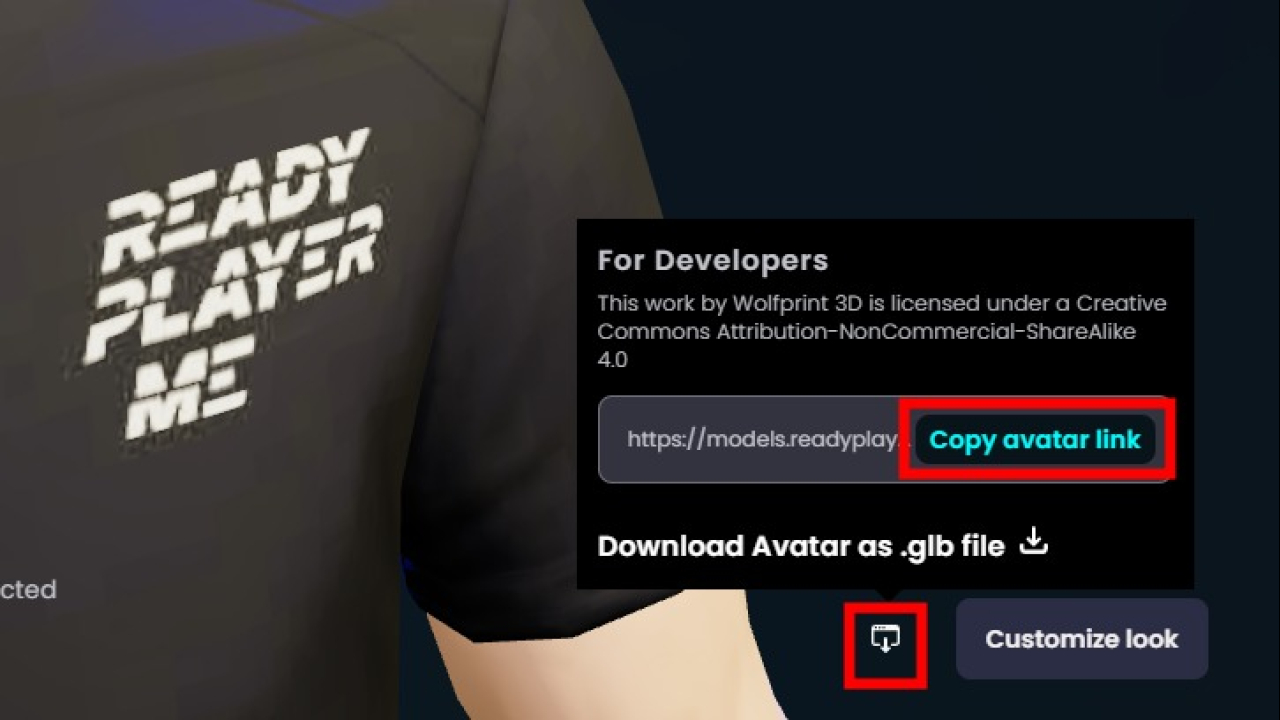
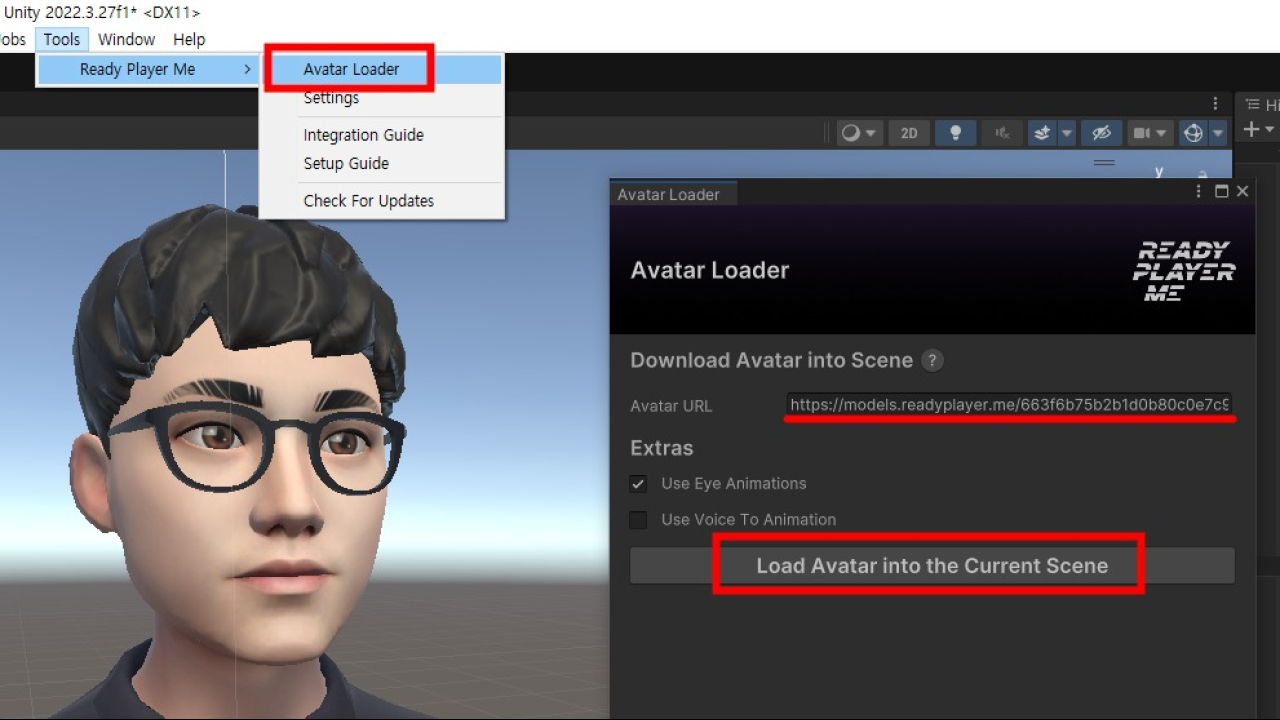
Oculus Lipsync Unity
- https://developer.oculus.com/downloads/package/oculus-lipsync-unity/
- 중간기록
public async void text_to_speech() { Debug.Log("text_to_speech"); var request = new TextToSpeechRequest() { Input = "Hello, brave new world! This is a test.", ResponseFormat = ResponseFormats.MP3, Model = Model.TTS_HD, Voice = Voices.Nova, Speed = 0.9 }; AudioClip clip; //await api.TextToSpeech.SaveSpeechToFileAsync(request, "test.aac"); //save to file using (Stream result = await api.TextToSpeech.GetSpeechAsStreamAsync(request)){ //get using (StreamReader reader = new StreamReader(result)){ // do something with the audio stream here int readerLength = (int)reader.BaseStream.Length; byte[] bytes = new byte[readerLength]; reader.BaseStream.Position = 0; reader.BaseStream.Read(bytes, 0, readerLength); float[] f = ConvertByteToFloat(bytes); int channels = 1; //Assuming audio is mono because microphone input usually is int sampleRate = 44100; //Assuming your samplerate is 44100 or change to 48000 or whatever is appropriate clip = AudioClip.Create("ClipName", f.Length, channels, sampleRate, false); clip.SetData(f, 0); } } AudioSource audioSource = gameObject.AddComponent<AudioSource>(); audioSource.clip = clip; //audioSource.loop = true; audioSource.Play(); } - stream을 가지고 재생하려 할게 아니라 file로 만든다음 파일을 로드하여 재생하면 되는거였음
    public async void text_to_speech()
    {
        Debug.Log("text_to_speech");
        var request = new TextToSpeechRequest()
        {
            Input = "Hello, brave new world!  This is a test.",
            ResponseFormat = ResponseFormats.MP3,
            Model = Model.TTS_HD,
            Voice = Voices.Nova,
            Speed = 0.9
        };
        FileInfo file_ = await api.TextToSpeech.SaveSpeechToFileAsync(request, "speak_tamp.mp3"); //save to file
        Debug.Log(file_.FullName);
        var www = new WWW(file_.FullName);
        AudioSource audioSource = gameObject.AddComponent<AudioSource>();
        audioSource.clip = www.GetAudioClip(true, true, AudioType.MPEG);
        audioSource.Play();
    }
